Heltec ESP WiFi Kit 8
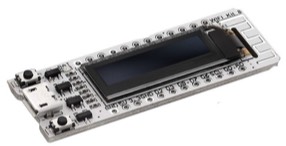
Voici un micro-contrôleur ESP 8266 fabriqué par Heltec. La particularité de celui-ci est qu'il embarque un écran Oled de 0,91 pouces (128x32 pixels). Il peut afficher trois lignes de caractères sans problème. Il a aussi un système de recharge pour une batterie additionnelle, ce qui peut le rendre autonome.
Vous pouvez vous procurer cet écran sur Amazon ou sur le site d'AZ-Delivery.
Vous pouvez vous procurer cet écran sur Amazon ou sur le site d'AZ-Delivery.
1 Premier programme : Affichage Oled
Tout au long de ce tutoriel, nous allons construire pas à pas une sonde pour mesurer la température et l'hygrométrie d'une pièce. Nous commencerons par l'ajout de la sonde et l'affichage des valeurs sur l'écran. Puis nous verrons la gestion du réseau et le protocole mDNS, ainsi qu'un petit serveur Web. Et enfin pour terminer, la gestion SNMP qui sera un peut plus élaboré que mon article précédent Utilisez un ESP8266 nodeMCU pour réaliser une sonde de température.
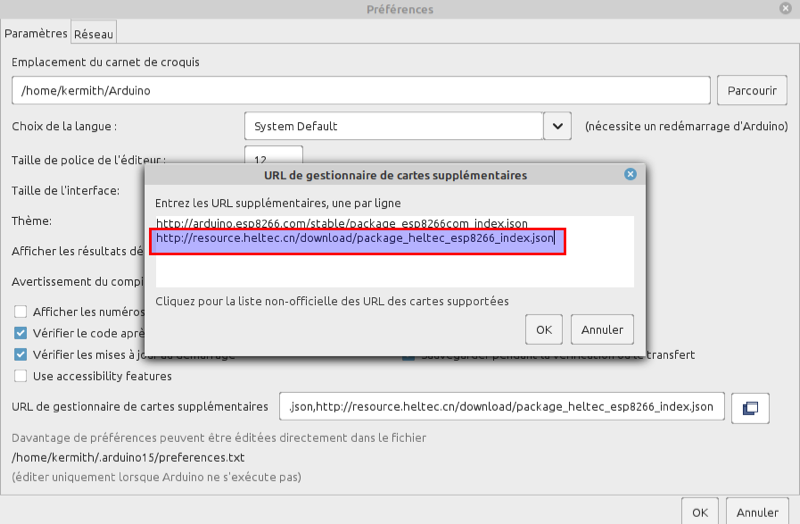
Nous commencerons par ajouter la bibliothèque dans l'IDE Arduino. Voici le lien à ajouter dans les préférences : http://resource.heltec.cn/download/package_heltec_esp8266_index.json
Nous commencerons par ajouter la bibliothèque dans l'IDE Arduino. Voici le lien à ajouter dans les préférences : http://resource.heltec.cn/download/package_heltec_esp8266_index.json
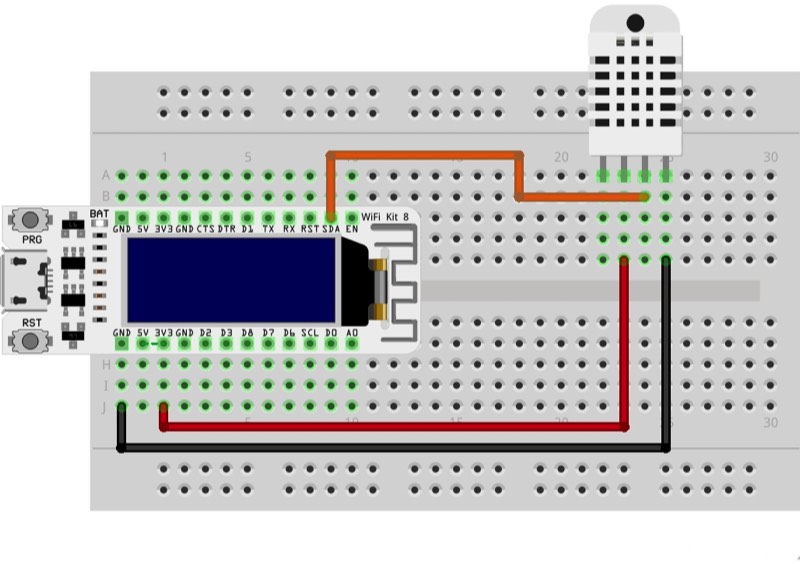
Voici le schéma d'installation sur une platine d'essai. La sonde dht22 sera alimenté en 3,3 V pour une utilisation ultérieure avec une batterie. La lecture de la sonde se fera sur le pin 14 (GPI02).
Nous allons créer notre premier programme. Commençons par la déclaration des librairies.
#include "DHT.h"  //bibliotheque sonde temperature
#include "heltec.h" //bibliotheque heltec 8266 Oled
Il faut initialiser la sonde et préparer le pin 14.
#define DHTPIN 2 // Pin digital connecté à la sonde

#define DHTTYPE DHT22   // on détermine le type de sonde

DHT dht(DHTPIN, DHTTYPE); //initialisation de la sonde
Dans la fonction setup, nous préparons l'affichage de l'écran.
void setup() {
  pinMode(DHTPIN, INPUT); //initialise le pin en mode Input - Entrée

  dht.begin(); //on démarre la sonde

  Heltec.begin(true /*DisplayEnable Enable*/, true /*Serial Enable*/); //initialisation de l'ESP
  Heltec.display->init();
  Heltec.display->flipScreenVertically(); //Affichage horizontal
  Heltec.display->setFont(ArialMT_Plain_10); //sélection de la police et la taille

  Heltec.display->drawString(0,0,"Sonde temperature V 1.00" ); //affichage du texte
  Heltec.display->display();
}
Et dans la boucle, la lecture de la sonde toutes les deux secondes.
void loop() {
// Wait a few seconds between measurements.
delay(2000);
// Reading temperature or humidity takes about 250 milliseconds!
// Sensor readings may also be up to 2 seconds 'old' (its a very slow sensor)
float h = dht.readHumidity();
// Read temperature as Celsius (the default)
float t = dht.readTemperature();
// clear the display
Heltec.display->clear();
Heltec.display->flipScreenVertically();
Heltec.display->setFont(ArialMT_Plain_10);
Heltec.display->drawString(0,0,"Sonde temperature V 1.00" );
Heltec.display->drawString(0,10,"Temperature : "+String(t));
Heltec.display->drawString(0,20,"Humidity : "+String(h));
Heltec.display->display();
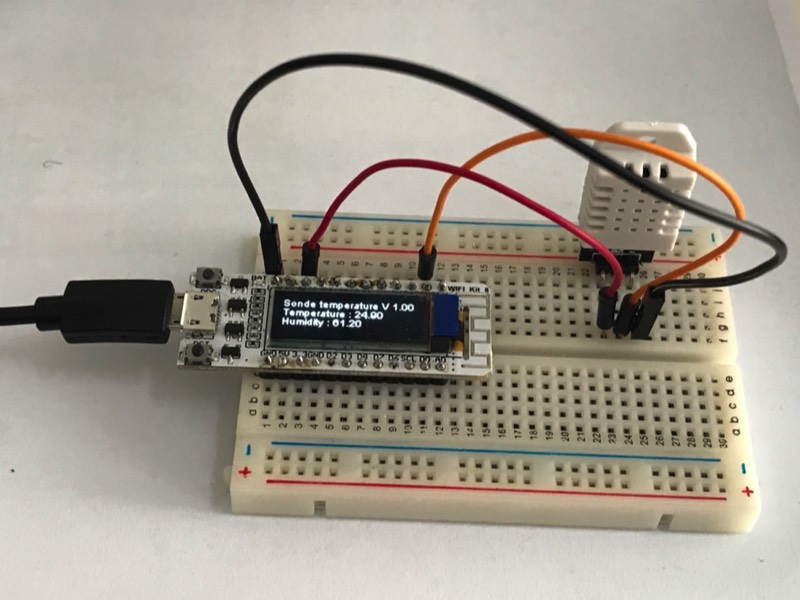
}Voici le fonctionnement, après téléchargement du programme.
2 Deuxième programme : Connexion Réseau
Continuons avec la connectivité Wifi pour rendre notre installation autonome. Commençons par la déclaration des librairies.
#include "DHT.h"  //bibliotheque sonde temperature
#include "heltec.h" //bibliotheque heltec 8266 Oled
#include <ESP8266WiFi.h> //bibliothèque wifi
#include <ESP8266WebServer.h> //bibliothèque serveur Web
#include <ESP8266mDNS.h> //bibliothèque mDNS
Il faut initialiser la sonde et préparer le pin 14. Nous allons définir le SSID du Wifi et son mot de passe. Pour améliorer la reconnaissance du matériel sur mon réseau de la maison, j'utilise le protocole mDNS. Je déclare un nom d'hôte pour mon ESP et j'initialise le mode serveur Web. J'utilise deux variable pour l'affichage de la page Web.
#define DHTPIN 2 // Pin digital connecté à la sonde

#define DHTTYPE DHT22   // on détermine le type de sonde

DHT dht(DHTPIN, DHTTYPE); //initialisation de la sonde

/*SSID et Password*/
const char* ssid = "SSID-WIFI";  // SSID
const char* password = "MotdePasse";  // Password

/* nom d'hôte pour l'ESP 8266 */
const char* hostString = "esptemp01";

ESP8266WebServer server(80); //initialisation du serveur Web

float Temperature;
float Humidity;
La fonction setup est plus complète que la précédente. En plus de l'affichage Oled, nous trouverons la procédure de connexion Wifi puis la configuration mDNS de notre équipement.
void setup() {
  pinMode(DHTPIN, INPUT); //initialise le pin en mode Input - Entrée

  dht.begin(); //on démarre la sonde

  Heltec.begin(true /*DisplayEnable Enable*/, true /*Serial Enable*/); //initialisation de l'ESP
  Heltec.display->init();
  Heltec.display->flipScreenVertically(); //Affichage horizontal
  Heltec.display->setFont(ArialMT_Plain_10); //sélection de la police et la taille

  Heltec.display->drawString(0,0,"Sonde temperature V 1.00" );
  Heltec.display->drawString(0,10,"Connecting to " + String(ssid) ); //affichage du SSID
  Heltec.display->display();
  //définition du nom d'hôte
  WiFi.hostname(hostString);

  //établissement de la connection Wifi Client
  WiFi.mode(WIFI_STA);

  //connection au WIFI
  WiFi.begin(ssid, password);

  int counter = 0;

  //Vérification de la connection Wifi
  while (WiFi.status() != WL_CONNECTED) {
    delay(1000);
    Heltec.display->drawString(counter * 10,20,".");
    Heltec.display->display();
    counter = counter + 1;
  }
  Heltec.display->drawString(0,20,"WiFi connected..!");
  Heltec.display->display();
  delay(1000);
   //démarrage de mDNS
  if (!MDNS.begin(hostString)) {
    Heltec.display->drawString(0,20,"erreur configuration mDNS!");
    Heltec.display->display();
    delay(1000);
  } else {
  Heltec.display->drawString(0,20, "repondeur mDNS demarrre");
  Heltec.display->display();
  delay(1000);
     server.on("/", handle_OnConnect);
     server.onNotFound(handle_NotFound);
     server.begin();

     //ajout service
     MDNS.addService("http", "tcp", 80);
  }

}
Voici en deux lignes de commande, un aspect de la configuration mDNS. Vous retrouvez facilement l'adresse IP de votre équipement avec cette commande
# ping esptemp01.local
PING esptemp01.local (192.168.1.31) 56(84) bytes of data.
64 bytes from ota-leds.home (192.168.1.31): icmp_seq=1 ttl=255 time=141 ms
Grâce à la commande ci-dessous, vous pouvez retrouver vos équipements en fonction des services qu'ils offrent. exemples _http._tcp pour un serveur Web et _ssh._tcp pour un équipement fonctionnant en ssh.
$ avahi-browse -t _http._tcp
+ enp0s31f6 IPv4 esptemp01                                     Web Site             local
+ enp0s31f6 IPv4 MacBook-Truc                                  Web Site             local
+ enp0s31f6 IPv4 Brother DCP-9020CDW                           Web Site             local
+ enp0s31f6 IPv4 NASMAISON2                                    Web Site             local
+ enp0s31f6 IPv4 NASMAISON1                                    Web Site             local
+ enp0s31f6 IPv4 LIVEBOX                                       Web Site             local
+ enp0s31f6 IPv4 switchfe1a74                                  Web Site             local

$ avahi-browse -t _ssh._tcp
+ enp0s31f6 IPv4 switchfe1a74                                  SSH Remote Terminal  local
La fonction loop comprend deux fonctions importantes au début pour le protocole mDNS et le serveur Web. La command MDNS.update permet le rafraîchissement du nom d'hôte surtout si vous le changez au cours de vos essais. Il reste trois fonctions pour le serveur Web à mettre en oeuvre pour terminer notre programme.
void handle_OnConnect() {
Temperature = dht.readTemperature(); // Gets the values of the temperature
Humidity = dht.readHumidity(); // Gets the values of the humidity
server.send(200, "text/html", SendHTML(hostString,Temperature,Humidity));
}
void handle_NotFound(){
server.send(404, "text/plain", "Not found");
}
String SendHTML(String hostStringstat, float Temperaturestat,float Humiditystat){
String ptr = "<!DOCTYPE html> <html>\n";
ptr +="<head>\n";
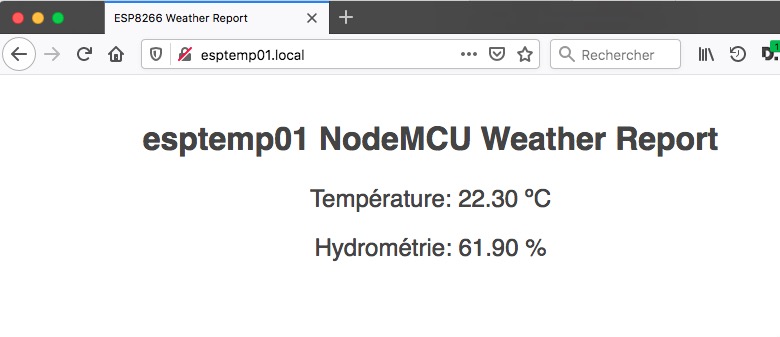
ptr +="<title>ESP8266 Weather Report</title>\n";
ptr +="<style>html { font-family: Helvetica; display: inline-block; margin: 0px auto; text-align: center;}\n";
ptr +="body{margin-top: 50px;} h1 {color: #444444;margin: 50px auto 30px;}\n";
ptr +="p {font-size: 24px;color: #444444;margin-bottom: 10px;}\n";
ptr +="</style>\n";
ptr +="</head>\n";
ptr +="<body>\n";
ptr +="<div id=\"webpage\">\n";
ptr +="<h1>";
ptr +=hostStringstat;
ptr +=" NodeMCU Weather Report</h1>\n";
ptr +="<p>Température: ";
ptr +=Temperaturestat;
ptr +=" ºC</p>";
ptr +="<p>Hydrométrie: ";
ptr +=Humiditystat;
ptr +=" %</p>";
ptr +="</div>\n";
ptr +="</body>\n";
ptr +="</html>\n";
return ptr;
}Voici une petite démo du démarrage du programme. Vous remarquerez un problème d'affichage au début de la vidéo. Nous allons y remédier dans le prochain chapitre.
00:00
/
00:00
Le serveur web de l'esp renvoie ses informations.
3 Troisième programme : Amélioration du programme
Pour améliorer l'affichage au démarrage, nous allons créer une fonction d'affichage de l'écran Oled. Nous passerons en arguments trois chaines de caractères correspondants aux trois lignes permises avec ce petit écran. Voici la fonction.
void Affiche(String ligne1, String ligne2, String ligne3){
  // clear the display
  Heltec.display->clear();
  Heltec.display->flipScreenVertically(); //Affichage horizontal
  Heltec.display->setFont(ArialMT_Plain_10);//sélection de la fonte
  // la fonte ArialMT est la seule disponible en trois tailles 10, 16, 24

  Heltec.display->drawString(0,0,ligne1);
  Heltec.display->drawString(0,10,ligne2);
  Heltec.display->drawString(0,20,ligne3);
  Heltec.display->display();

}
Et le programme complet.
#include "DHT.h"  //bibliotheque sonde temperature
#include "heltec.h" //bibliotheque heltec 8266 Oled
#include <ESP8266WiFi.h> //bibliothèque wifi
#include <ESP8266WebServer.h> //bibliothèque serveur Web
#include <ESP8266mDNS.h> //bibliothèque mDNS


void handle_OnConnect() {
  Temperature = dht.readTemperature(); // Gets the values of the temperature
  Humidity = dht.readHumidity(); // Gets the values of the humidity
  server.send(200, "text/html", SendHTML(hostString,Temperature,Humidity));
}

void handle_NotFound(){
  server.send(404, "text/plain", "Not found");
}

#define DHTPIN 2 // Pin digital connecté à la sonde

#define DHTTYPE DHT22   // on détermine le type de sonde

DHT dht(DHTPIN, DHTTYPE); //initialisation de la sonde

/*SSID et Password*/
const char* ssid = "SSID-WIFI";  // SSID
const char* password = "MotdePasse";  // Password

/* nom d'hôte pour l'ESP 8266 */
const char* hostString = "esptemp01";

ESP8266WebServer server(80); //initialisation du serveur Web

float Temperature;
float Humidity;


void setup() {
  pinMode(DHTPIN, INPUT); //initialise le pin en mode Input - Entrée

  dht.begin(); //on démarre la sonde

  Heltec.begin(true /*DisplayEnable Enable*/, true /*Serial Enable*/); //initialisation de l'ESP
  Heltec.display->init();
  Affiche("Sonde temperature V 1.00", "Connecting to " + String(ssid), "");

  //définition du nom d'hôte
  WiFi.hostname(hostString);

  //établissement de la connection Wifi Client
  WiFi.mode(WIFI_STA);

  //connection au WIFI
  WiFi.begin(ssid, password);

  int counter = 0;

  //Vérification de la connection Wifi
  while (WiFi.status() != WL_CONNECTED) {
    delay(1000);
    Heltec.display->drawString(counter * 10,20,".");
    Heltec.display->display();
    counter = counter + 1;
  }
  Affiche("Sonde temperature V 1.00", "Connecting to " + String(ssid), "WiFi connected..!");
  delay(1000);
   //démarrage de mDNS
  if (!MDNS.begin(hostString)) {
    Heltec.display->drawString(0,20,"erreur configuration mDNS!");
    Heltec.display->display();
    delay(1000);
  } else {
   Affiche("Sonde temperature V 1.00", "Connecting to " + String(ssid), "repondeur mDNS demarrre");
  delay(1000);
     server.on("/", handle_OnConnect);
     server.onNotFound(handle_NotFound);
     server.begin();

     //ajout service
     MDNS.addService("http", "tcp", 80);
  }
}

void loop() {
  MDNS.update(); //mise à jour, important pour forcer le changement sur une box
  server.handleClient();
  // Wait a few seconds between measurements.
  delay(2000);
  // Reading temperature or humidity takes about 250 milliseconds!
  // Sensor readings may also be up to 2 seconds 'old' (its a very slow sensor)
  float h = dht.readHumidity();
  // Read temperature as Celsius (the default)
  float t = dht.readTemperature();
  Affiche("IP : " + WiFi.localIP().toString(), "Temperature : "+String(t), "Humidity : "+String(h));
}

void Affiche(String ligne1, String ligne2, String ligne3){
  // clear the display
  Heltec.display->clear();
  Heltec.display->flipScreenVertically(); //Affichage horizontal
  Heltec.display->setFont(ArialMT_Plain_10);//sélection de la fonte
  // la fonte ArialMT est la seule disponible en trois tailles 10, 16, 24

  Heltec.display->drawString(0,0,ligne1);
  Heltec.display->drawString(0,10,ligne2);
  Heltec.display->drawString(0,20,ligne3);
  Heltec.display->display();

}


String SendHTML(String hostStringstat, float Temperaturestat,float Humiditystat){
  String ptr = "<!DOCTYPE html> <html>\n";
  ptr +="<head>\n";
  ptr +="<title>ESP8266 Weather Report</title>\n";
  ptr +="<style>html { font-family: Helvetica; display: inline-block; margin: 0px auto; text-align: center;}\n";
  ptr +="body{margin-top: 50px;} h1 {color: #444444;margin: 50px auto 30px;}\n";
  ptr +="p {font-size: 24px;color: #444444;margin-bottom: 10px;}\n";
  ptr +="</style>\n";
  ptr +="</head>\n";
  ptr +="<body>\n";
  ptr +="<div id=\"webpage\">\n";
  ptr +="<h1>";
  ptr +=hostStringstat;
  ptr +=" NodeMCU Weather Report</h1>\n";

  ptr +="<p>Température: ";
  ptr +=Temperaturestat;
  ptr +=" ºC</p>";
  ptr +="<p>Hydrométrie: ";
  ptr +=Humiditystat;
  ptr +=" %</p>";

  ptr +="</div>\n";
  ptr +="</body>\n";
  ptr +="</html>\n";
  return ptr;
}
Dans cette vidéo, vous pouvez voir l'amélioration de l'affichage.
00:00
/
00:00
4 Quatrième programme : Gestion du SNMP
Si nous voulons utiliser notre montage pour contrôler la température d'une pièce, il nous faut un moyen de communication simple pour envoyer les informations à un système de supervision. Nous utiliserons le protocole SNMP comme l'article suivant Sonde de température. Il va être amélioré en ajoutant des informations standard comme la description, la localisation et l'uptime.
Commençons par la déclaration des librairies.
#include "DHT.h"  //bibliotheque sonde temperature
#include "heltec.h" //bibliotheque heltec 8266 Oled
#include <ESP8266WiFi.h> //bibliothèque wifi
#include <ESP8266WebServer.h> //bibliothèque serveur Web
#include <ESP8266mDNS.h> //bibliothèque mDNS
#include  <WiFiUdp.h> //bibliothèque UDP nécessaire au SNMP
#include  <Arduino_SNMP.h> //bibliothèque SNMP
On passe à l'initialisation des différents objets. Dans ce programme, le nom de communauté (public) sera inscrit en dur ainsi que les différents paramètres SNMP (description, contact, name, location et services).
WiFiUDP udp;
SNMPAgent snmp = SNMPAgent("public");  // Starts an SMMPAgent instance with the community string 'public'

// RFC1213-MIB OIDs
// .iso (.1)
// .iso.org (.1.3)
// .iso.org.dod (.1.3.6)
// .iso.org.dod.internet (.1.3.6.1)
// .iso.org.dod.internet.mgmt (.1.3.6.1.2)
// .iso.org.dod.internet.mgmt.mib-2 (.1.3.6.1.2.1)
// .iso.org.dod.internet.mgmt.mib-2.system (.1.3.6.1.2.1.1)
// .iso.org.dod.internet.mgmt.mib-2.system.sysDescr (.1.3.6.1.2.1.1.1)
// .iso.org.dod.internet.mgmt.mib-2.system.sysDescr (.1.3.6.1.2.1.1.1)
char* description = "Heltec ESP 8266 Oled Wifi Kit 8";
// .iso.org.dod.internet.mgmt.mib-2.system.sysObjectID (.1.3.6.1.2.1.1.2)
// .iso.org.dod.internet.mgmt.mib-2.system.sysUpTime (.1.3.6.1.2.1.1.3)
uint32_t locUpTime = 0;
// .iso.org.dod.internet.mgmt.mib-2.system.sysContact (.1.3.6.1.2.1.1.4)
char* contact="Kermith72";
// .iso.org.dod.internet.mgmt.mib-2.system.sysName (.1.3.6.1.2.1.1.5)
char* sname="ESP Temperature";
// .iso.org.dod.internet.mgmt.mib-2.system.sysLocation (.1.3.6.1.2.1.1.6)
char* location="Le Mans";
// .iso.org.dod.internet.mgmt.mib-2.system.sysServices (.1.3.6.1.2.1.1.7)
int services = 7;  // applicatif

int TempSNMPC = 0;
int TempSNMPF = 0;
int TempSNMPHumidity = 0;
int settableNumber = 0;
uint32_t prevMillis = millis();


#define DHTPIN 2 // Pin digital connecté à la sonde

#define DHTTYPE DHT22   // on détermine le type de sonde

DHT dht(DHTPIN, DHTTYPE); //initialisation de la sonde

/*SSID et Password*/
const char* ssid = "SSID-WIFI";  // SSID
const char* password = "MotdePasse";  // Password

/* nom d'hôte pour l'ESP 8266 */
const char* hostString = "esptemp01";

ESP8266WebServer server(80); //initialisation du serveur Web

float Temperature;
float Humidity;
Dans la fonction setup, on ajoutera la gestion du SNMP en initialisant les OIDs de la Mib. J'ai rajouté le moniteur série pour éventuellement débogguer le programme.
void setup() {
  pinMode(DHTPIN, INPUT); //initialise le pin en mode Input - Entrée

  Serial.begin(115200);
  Serial.println("Debug programme");

  dht.begin(); //on démarre la sonde

  Heltec.begin(true /*DisplayEnable Enable*/, true /*Serial Enable*/); //initialisation de l'ESP
  Heltec.display->init();
  Heltec.display->flipScreenVertically(); //Affichage horizontal
  Heltec.display->setFont(ArialMT_Plain_10); //sélection de la police et la taille

  Heltec.display->drawString(0,0,"Sonde temperature V 1.00" );
  Heltec.display->drawString(0,10,"Connecting to " + String(ssid)); //affichage SSID
  Heltec.display->display();

  //définition du nom d'hôte
  WiFi.hostname(hostString);

  //établissement de la connection Wifi Client
  WiFi.mode(WIFI_STA);

  //connection au WIFI
  WiFi.begin(ssid, password);

  int counter = 0;

  //Vérification de la connection Wifi
  while (WiFi.status() != WL_CONNECTED) {
    delay(1000);
    Heltec.display->drawString(counter * 10,20,".");
    Heltec.display->display();
    counter = counter + 1;
  }
  Heltec.display->drawString(0,20,"WiFi connected..!");
  Heltec.display->display();

  //démarrage de mDNS
  if (!MDNS.begin(hostString)) {
    Heltec.display->drawString(0,20,"erreur configuration mDNS!");
    Heltec.display->display();
  } else {
     Heltec.display->drawString(0,20,"repondeur mDNS demarrre");
     Heltec.display->display();
     server.on("/", handle_OnConnect);
     server.onNotFound(handle_NotFound);
     server.begin();

     //ajout service
     MDNS.addService("http", "tcp", 80);
  }

     // give snmp a pointer to the UDP object
    snmp.setUDP(&udp);
    snmp.begin();

    // add 'callback' for an OID
    snmp.addStringHandler(".1.3.6.1.2.1.1.1.0", &description);
    // add 'callback' for an OID
    snmp.addCounter32Handler(".1.3.6.1.2.1.1.3.0", &locUpTime);
    // add 'callback' for an OID
    snmp.addStringHandler(".1.3.6.1.2.1.1.4.0", &contact);
    // add 'callback' for an OID
    snmp.addStringHandler(".1.3.6.1.2.1.1.5.0", &sname);
    // add 'callback' for an OID
    snmp.addStringHandler(".1.3.6.1.2.1.1.6.0", &location);
    // add 'callback' for an OID
    snmp.addIntegerHandler(".1.3.6.1.2.1.1.7.0", &services);

    //add mib privé
    // add 'callback' for an OID - Temperature Celsius
    snmp.addIntegerHandler(".1.3.6.1.4.1.39981.1.0", &TempSNMPC);
    // add 'callback' for an OID - Temperature Farenheit
    snmp.addIntegerHandler(".1.3.6.1.4.1.39981.1.1", &TempSNMPF);
    // add 'callback' for an OID - Humidity
    snmp.addIntegerHandler(".1.3.6.1.4.1.39981.1.2", &TempSNMPHumidity);
    // you can accept SET commands with a pointer to an integer (or string)
    snmp.addIntegerHandler(".1.3.6.1.4.1.39981.1.3", &settableNumber, true);


}
Voici le reste du programme, la nouveauté vient de la gestion du SNMP avec la fonction snmp.loop() et l'incrémentation de l'uptime.
void loop() {
  MDNS.update(); //mise à jour, important pour forcer le changement sur une box

  snmp.loop(); // must be called as often as possible
  if(snmp.setOccurred){
      Serial.printf("Number has been set to value: %i", settableNumber);
      snmp.resetSetOccurred();
  }
  if ( millis() - prevMillis > 1000 ) {
    // increment previous milliseconds
    prevMillis += 1000;
    //
    // increment up-time counter
    locUpTime += 100;
  }

  server.handleClient();
  // Wait a few seconds between measurements.
  delay(2000);
  // Reading temperature or humidity takes about 250 milliseconds!
  // Sensor readings may also be up to 2 seconds 'old' (its a very slow sensor)
  float h = dht.readHumidity();
  // Read temperature as Celsius (the default)
  float t = dht.readTemperature();
  // Read temperature as Fahrenheit (isFahrenheit = true)
  float f = dht.readTemperature(true);
  // conversion pour le SNMP
  TempSNMPC = int(t * 100) ;
  TempSNMPF = int(f * 100) ;
  TempSNMPHumidity = int(h * 100) ;
  // clear the display
  Heltec.display->clear();
  Heltec.display->flipScreenVertically();
  Heltec.display->setFont(ArialMT_Plain_10);

  Heltec.display->drawString(0,0,"IP : " + WiFi.localIP().toString());
  Heltec.display->drawString(0,10,"Temperature : "+String(t));
  Heltec.display->drawString(0,20,"Humidity : "+String(h));
  Heltec.display->display();
}

void handle_OnConnect() {
  Temperature = dht.readTemperature(); // Gets the values of the temperature
  Humidity = dht.readHumidity(); // Gets the values of the humidity
  server.send(200, "text/html", SendHTML(hostString,Temperature,Humidity));
}

void handle_NotFound(){
  server.send(404, "text/plain", "Not found");
}


String SendHTML(String hostStringstat, float Temperaturestat,float Humiditystat){
  String ptr = "<!DOCTYPE html> <html>\n";
  ptr +="<head>\n";
  ptr +="<title>ESP8266 Weather Report</title>\n";
  ptr +="<style>html { font-family: Helvetica; display: inline-block; margin: 0px auto; text-align: center;}\n";
  ptr +="body{margin-top: 50px;} h1 {color: #444444;margin: 50px auto 30px;}\n";
  ptr +="p {font-size: 24px;color: #444444;margin-bottom: 10px;}\n";
  ptr +="</style>\n";
  ptr +="</head>\n";
  ptr +="<body>\n";
  ptr +="<div id=\"webpage\">\n";
  ptr +="<h1>";
  ptr +=hostStringstat;
  ptr +=" NodeMCU Weather Report</h1>\n";

  ptr +="<p>Température: ";
  ptr +=Temperaturestat;
  ptr +=" ºC</p>";
  ptr +="<p>Hydrométrie: ";
  ptr +=Humiditystat;
  ptr +=" %</p>";

  ptr +="</div>\n";
  ptr +="</body>\n";
  ptr +="</html>\n";
  return ptr;
}
Quelques exemples de requêtes SNMP
$ snmpwalk -c public -v 1 192.168.1.31 sysdescr
SNMPv2-MIB::sysDescr.0 = STRING: Heltec ESP 8266 Oled Wifi Kit 8
$ snmpwalk -c public -v 1 192.168.1.31 sysuptime
DISMAN-EVENT-MIB::sysUpTimeInstance = Counter32: 111300
$ snmpwalk -c public -v 1 192.168.1.31 .1.3.6.1.4.1.39981.1.0
SNMPv2-SMI::enterprises.39981.1.0 = INTEGER: 2230
Et un exemple avec la supervision Centreon
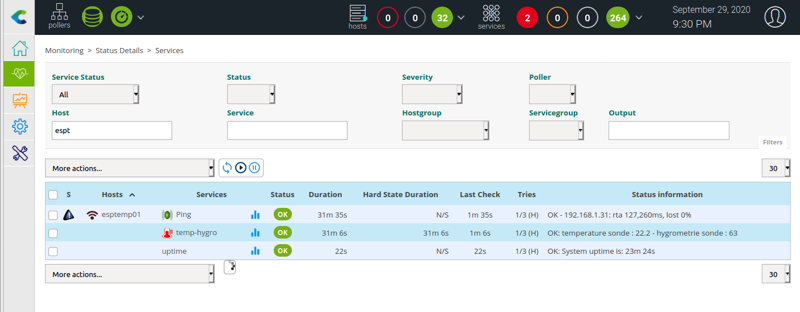
Dernière modification: 30/07/2023